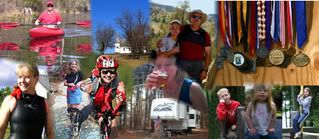
Several people have asked me, so here's the quick-and-easy explanation. (The explanation, not the process, is quick and easy, LOL!)
Basically, I stitched photos together in Photoshop Elements, uploaded the result to Photobucket.com, then pasted the HTML tag into my template under "Head."
It took a lot of trial and error to get it right. I had to do a lot of resizing and moving images around to get them to fit together (like a puzzle, it was fun) and there are still a couple of mistakes -- like Abbie's head poking up into the picture of my medals. I have some new pictures I might want to add so I may be messing with it some more.
I had put up a longer post about this, but then thought maybe that wasn't what people wanted, maybe they were just asing a question, not asking for step-by-step instructions. So here is the new abbreviated version. If you would like the blow-by-blow, let me know and I'll email you the long one.
OR..... what I should REALLY do is say, "Send me your pictures and I'll make you one for a price!" :-D But I'm such a good blog friend, I'll just tell you how...
OR.... if you don't want to do it yourself..... I'm no HTML wizard but I could give it a shot. Here's my email address: ehmltn@hotmail.com
What the hey, nothing ventured, nothing gained.
4 comments:
I guess I didn't realize you had made it yourself. I want to put a banner on mine, but I really have NO time to figure this stuff out (at work of course), so may give your instructions a try, and if not, I'll let you try your hand at it. For a price of course! A mystery prize.
Ellie, the banner is awesome. I'm working of a banner of my own besides doing some updating on the blog.
Wow, it's only 10 weeks until your first marathon of the year! Hope the marathon training is going well.
Anyway, please have a good Sunday! - Wayne
Cool, I am going to have to work on something for my blog.
Thanks for the tips on how to get started.
Looks great! I will have to play around with it a bit and see if I can come up with something! Thanks! :)
Post a Comment